Str8RigSt
Every so often I get on a boat that has rig-tune “issues” and sometimes the more we try to tune the rig straight, the worse it gets. When this happens I find it useful to step back and focus on five rules that make up what I call my Rig-Tune Primer. This guide helps me quickly figure out whether the rig is straight in the boat, and what to do if it’s not.
Rule No. 1: Start with the basics
There are three reasons we want a straight rig on any raceboat: we want a symmetric structure that gives us an identical mainsail shape on both tacks, we want that structure to bend evenly fore and aft, so it matches the luff curve of the mainsail, and we want to be able to alter the mast bend evenly on both tacks (via rig tension changes) throughout the wind range to provide the mainsail with power when we need it and a flat shape when we’re overpowered.
In some classes it may be fast to let the mast sag to leeward in the middle to add some power to the mainsail in some conditions, and in other boats, shims can be adjusted at the partners while racing, but either adjustment will be more effective if the mast is straight in the boat to begin with.
Let’s assume you have a bad day on the water where the boat felt different on each tack, and the mainsail looked different as well. You look up the rig on your way in to the harbor and the mast resembles a piece of pasta al dente. Here’s where the next of our rig-tune rules applies.
Rule No. 2: Start from the masthead and work your way down
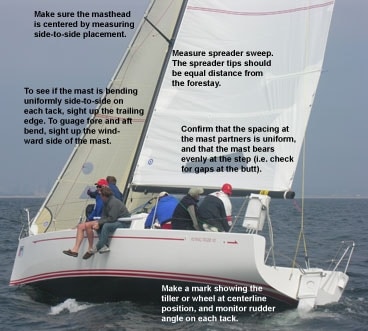
First, make sure the mast tip is as close to centered in the boat as possible. On bigger boats, I like to measure this by hanging a crewmember in a harness over the side on the main halyard, just above the water. The halyard will bear against the hull or chainplates at the same tension on each tack. (If you don’t have a volunteer or a harness, you can also use something heavy, such as a handled one-gallon water jug filled with water.) Mark the halyard at a point of intersection on one side and compare that measurement against an identical point on the other side of the boat. On a smaller boat, the free end of a tape measure hoisted to the top of the mast on a light-air morning works really well. Adjust your upper shrouds until your measurement shows the tip is centered.
By now, you may have uncovered yet another realization on your quest for rig symmetry: boatbuilding is not an exact science. Often, the more you measure, the more you find that the boat itself is asymmetric; the chainplates may not be in the exact location on each side, or the mast step and partners aren’t perfectly aligned. If this is the case, and if you have the time and the resources, consider renting a laser level and hanging some plumb bobs the next time the boat is out of the water. This will reveal your boat’s idiosyncrasies.
The partners (the hole in the deck where the mast passes through) are a common cause of rig asymmetry. Ideally, the partners are perfectly centered over the top of the mast step when the boat is built, and typically the builder will make the partners wider than the tube to make it easier to step and un-step the mast. Most raceboats have shimming material in the partners to keep the mast stable once it is stepped, and because the mast is locked in by the shim material (hard plastic, wood, or a poured resin like Spartite), the partners act like another set of spreaders to keep the mast in column. If one is “longer” than the other, the mast will be pushed out of column, and it will be impossible to tune that problem away with adjustments to the vertical or diagonal shrouds.
In fact, we had this very problem on a Farr 40 I once sailed with. During one regatta, the helmsman and I were trying to work out why the rudder felt more loaded on one tack than the other. One of the trimmers commented that the jib looked different tack to tack. On port tack, the jib met the spreader farther inboard than on starboard tack, with the sheet set the same. How could that be? We thought about the geometry a bit, and came to the conclusion that if the tack was fixed, and the clew was sheeted to the same distance from the lead block, then the head of the sail must be in a different place in space on each tack. This confirmed we had some serious side-bend issues.
After making careful measurements at the dock, we discovered that the shim material in the partners was pushing the mast slightly to port, which gave the mast a permanent wiggle in the panel between the gooseneck and the first set of spreaders. The mainsail set up beautifully on starboard tack, but in order to get the mast to look right on port tack, we had changed the vertical and diagonal shrouds so far out of the tuning guide that the tip was off to one side, which made the sail deeper on port tack (as noticed by the trimmer and helmsman), and even made the jib sheet into the rig differently.
Amazingly, once we shifted the mast partners about 5mm, the rig tuned perfectly on each tack, the mainsail set up the same, and the helmsman could no longer detect the helm difference that had plagued him at the previous regatta.
If you’re having difficulty tuning the mast straight on a rig that is deck-stepped, be certain that the mast butt bears evenly on the step. If the walls of the tube are not sharing the load evenly, the mast will want to bow out of column once compression in the form of rig and sheet tension is applied. Check for any gaps around the mast butt while sailing, as you want that interface between mast and step to be locked in, particularly side to side. There is an exception on some smaller boats, where you can induce or reduce pre-bend by shimming under the mast, to purposely load either the front or back of the mast. For example, in light air a very thin shim (like an aluminum can or lucky coin) could be added under the aft edge of the step, which forces pre-bend into the bottom section of the mast by loading the aft wall more than the front. That same shim might be removed for medium air, and even added to the front of the rig to prevent pre-bend in heavy air when you are already bending the mast with backstay and boom vang.
The final area to check is your spreaders. Many classes have a sweep measurement in the tuning guide, and you should make sure this measurement is symmetric. To do this, run a tape measure from each spreader tip forward to a fixed point on the headstay. On a smaller boat you can make that same measurement aft to the backstay or even down to the transom. OK, you feel confident you’ve got the rig in the right place, so it’s time to move onto the next step.
Rule No. 3: Get the mainsail to set the same on each tack
While sailing upwind, watch the mainsail from under the boom on each tack, keeping the mainsheet and backstay tension the same and sighting from a specified point on the boom. If everything is right the leech telltales should be flowing evenly on each tack and the horizontal or diagonal wrinkles should look the same on each side. If the sublties are difficult to see with your naked eye, then take a digital photo from the same sight point on the boom on each tack and compare later with your crew. Mark the boom so the camera is shooting from the same place all the time.
Next, it’s time to make sure the mast looks the same, side to side, on each tack. To do this, face the bow and sight up the aft edge of the rig. Get your head right in next to the sail, above the boom. If the mast is out of column, a small adjustment to one of the diagonal shrouds may bring the mast in line. Have a look on the other tack and see how it compares. I also face aft and sight up the leading edge of the rig to get a comparison with the trailing-edge view. Typically, the view up the front face doesn’t show the subtleties of the column, but will provide a better look at how much the mast tip is falling off to leeward.
If you noticed earlier that the sail had some overbend wrinkles radiating aft and down from the luff that looked different tack to tack, have a look at the fore and aft symmetry. Stand at the windward side of the mast and sight up to the masthead, following along the mainsail boltrope slot. It can be difficult to see this fore and aft bend, but after a few tacks it’ll be evident if there’s a difference. Another trick is to take a digital photo of this view, holding the camera at the gooseneck fitting, and shooting up along the windward face of the mast. You can then use any photo software to draw a line from the gooseneck up to the mast tip and compare the two tacks. Or, just print the photos out and hold a ruler on a line between the gooseneck and the tip. If the mast bends differently on one tack, it could be asymmetry in the sweep of the spreaders, so note to double-check this measurement at the dock.
Rule No. 4: Get the boat to feel right on each tack
I like to describe the sensation of rig asymmetry as grumpy versus fast. Sometimes, the boat just feels wrong on one tack; it’s hard to build speed and tough to keep the speed in windshifts and waves. If you have wheel steering, make an accurate centerline mark on it, and you can see if your rudder angle is similar tack to tack. With a tiller, monitor the angle relative to a fixed point in the center of the cockpit.
Clues to grumpiness may include the helmsman feeling more pressure on one tack. The boat may feel better with the traveler higher on one tack than the other. The mainsheet may need to be eased slightly on one tack to get the telltales to flow evenly. It’s easier to build to full speed on one tack than the other, the mainsail requires more cunningham tension on one tack, or the helmsman begs for the traveler to come up on one tack and down on the other.
These symptoms are often caused by a mainsail that is set up full on one tack and flat on the other because of asymmetric mast bend. Some of these clues are obvious, and some are fairly subtle, but keep in mind that the boat may feel grumpy on one tack because of a varied wave angle or a bit of wind sheer. If you notice any one of these clues, monitor it carefully and see if it reappears in different wind and wave conditions.
Rule No. 5: Write everything down
It’s important too keep a running log of any changes you make to the rig, so you can repeat fast settings and quickly get back to basics if you get confused. Be sure to share the notes with the trimmers and keep the notebook on board so it’s always handy. And finally, remember that in the end, what you’re after is a symmetrical rig so you can apply your tuning guide over the wind range with confidence.
This article first appeared in the April 2006 issue of Sailing World.